Azure DevOps Integration
Documents the following: * Adding Projects to SonarQube * Adding SonarQube tasks to Azure DevOps Pipelines * Adding PR Decorations from SonarQube
The majority of this documentation is based on SonarQube/Azure DevOps Integration.
For all AzDo repo pipelines under MDTProductDevelopment, the SonarQube project is automatically created by the Build and Deploy team with an automation script which runs for every 4 hours.
In the case AzDO repos are not code-based repos(document/ binary etc.), but a SonarQube project that was created either manually or through automation process in past:
Add a comment #NOCODEREPO in line#1 of repo’s “azure-pipelines.yml“ file and then delete corresponding SonarQube project. This will notify the automation process to skip creating sonarqube projects for these non-code-based repos.
Add SonarQube to Azure DevOps Pipelines
After setting up your repository as a Project in SonarQube, you will need to add SonarQube tasks to your Azure DevOps YAML Pipeline so code can be analyzed and results can be posted to Pull Requests.
Requires the following SonarQube Tasks * Prepare Analysis Configuration * Run Code Analysis * Publish Quality Gate Result
More details and more language examples can be found in the official SonarQube/Azure Devops Integration documentation.
Once your pipeline runs, you will see the analysis results in SonarQube. This configuration automatically sets up Pull Request Decorations as well.
NOTE: SonarQubePrepare@4/5 is deprecated, please ensure you are using SonarQubePrepare@6.
Adding .NET Analysis
Example in your .yml pipeline file
trigger:
- master
- feature/*

steps:
# Prepare Analysis Configuration task
- task: SonarQubePrepare@6
  inputs:
    SonarQube: '<YourSonarqubeServiceConnection>'
    scannerMode: 'MSBuild'
    projectKey: '<YourProjectKey>'

# Run Code Analysis task
- task: SonarQubeAnalyze@6

# Publish Quality Gate Result task
- task: SonarQubePublish@6
  inputs:
    pollingTimeoutSec: '300'
Adding Maven or Gradle Analysis
Example in your .yml pipeline file
trigger:
- master
- feature/*

steps:
# Prepare Analysis Configuration task
- task: SonarQubePrepare@6
  inputs:
    SonarQube: '<YourSonarqubeServiceConnection>'
    scannerMode: 'Other'
    extraProperties: 'sonar.projectKey=<YourProjectKey>'

# Publish Quality Gate Result task
- task: SonarQubePublish@6
  inputs:
    pollingTimeoutSec: '300'
Adding C/C++/Obj-C Analysis
Example in your .yml pipeline file
trigger:
- master
- feature/*

steps:
# Make Build Wrapper available
- task: Bash@3
  displayName: Download Build Wrapper
  inputs:
    targetType: inline
    script: >
      curl  '<SONARQUBE_HOST>/static/cpp/build-wrapper-linux-x86.zip' --output build-wrapper.zip
      unzip build-wrapper.zip

# Prepare Analysis Configuration task
- task: SonarQubePrepare@6
  inputs:
    SonarQube: '<YourSonarqubeServiceConnection>'
    scannerMode: 'CLI'
    configMode: 'manual'
    cliProjectKey: '<YourProjectKey>'
    extraProperties: "sonar.cfamily.build-wrapper-output=bw_output"
# Command Line task to run your build.
- task: Bash@3
   displayName: Bash Script
   inputs:
     targetType: inline
     script: >
       ./build-wrapper-linux-x86/build-wrapper-linux-x86-64 --out-dir bw_output <Your build command>

# Run Code Analysis task
- task: SonarQubeAnalyze@6

# Publish Quality Gate Result task
- task: SonarQubePublish@6
  inputs:
    pollingTimeoutSec: '300'
Pull Request Decorations
PR Decorations will happen automatically when an Azure DevOps Repository is added via the
steps detailed in Add Projects to SonarQube.
Pull request decoration shows your quality gate and analysis metrics directly in Azure DevOps. As stated before PR decoration should happen automatically once a successful SonarQube analysis runs and the results are published to the server.
Adding pull request decoration to a manually created or existing project
Go to your project and on the top right click:
project settings > general settings > DevOps platform integration *and fill the required fields
Pull Request Optional Checks
By default, PR Decorations will show up as Optional Checks in Pull Requests.
Example:

Pull Request Required Status Checks
You can make the Status Check required by enabling a branch policy to require SonarQube Quality check. You will need to be a Project Administrator to do the following:
- Go to
Project Settings -> Repositories - Click the targeted repository
- On the right side, click on
Propertiestab - In the
Branch Policiessection, select the targeted branch you like to enable Status Checks for - In the
Status Checkssection, click on the+symbol - In the
Add status policywindow, click on the drop down menu underStatus to check* - Select
SonarQube/quality gate - Ensure that
Requiredis selected underPolicy requirement - Click
Save
Example:

Interpret Results
There is a possibility to integrate results reporting into source control systems (Azure DevOps, GitHub, etc.) but it is also important to travel to the SonarQube webpage and view analysis project/issues. Visit the Projects tab within the navigation ribbon of SonarQube and click the project name.

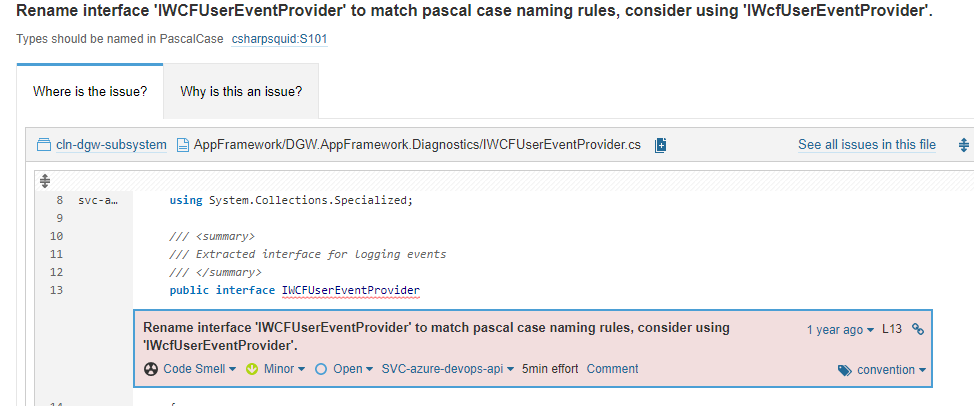
Familiarize yourself with the project sub-navigation ribbon; especially the issues tab:

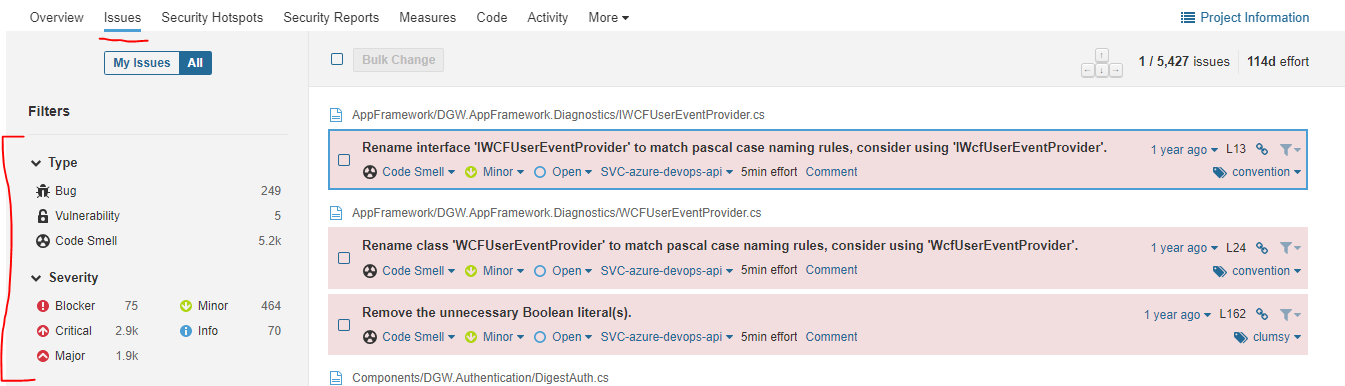
Filtering issues for criticality is an important way to tackle priority issues within a code base. Clicking directly on the issue (red box) will down even further referencing code snippets where the issue occurred and possibly suggesting a solution to prevent the pitfall in the future.