Work Item Documentation and Process
Overview
Having good documentation practices captured on work items is critical for both having high quality software and also maintaining a history for regulators to look at if an investigation is ever launched on work performed. This process discusses both good documentation practices on work items and a generalized process for documenting tasks with Azure DevOps using Boards. Note that this process documents also the use of work item templates to help people remember the contents and format for good documentation practices.
Generally, when documenting a task work item the following should be captured.
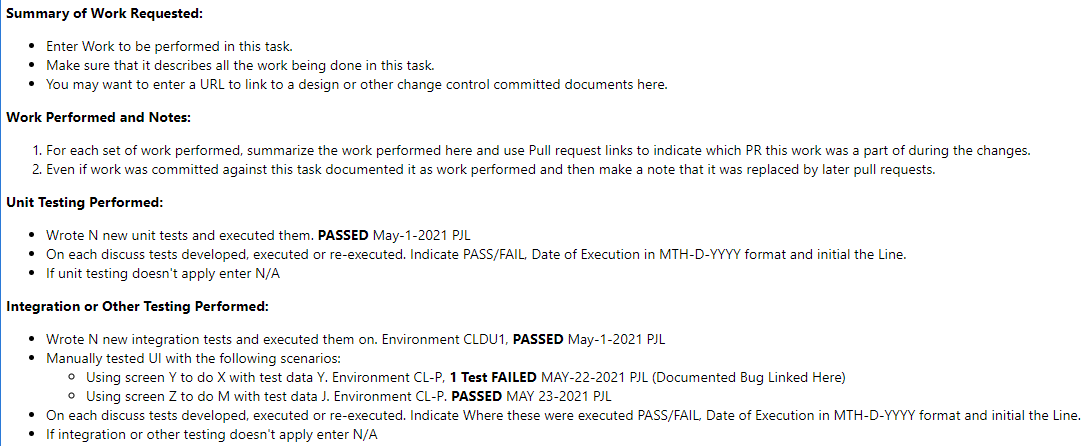
- The work requested from the user story being implemented.
- The work performed and any important notes about that work.
- How the software was tested at the unit (lowest) level, if applicable.
- The other types of testing that was performed on this task, if applicable. This is usually automated integration or manual/exploratory testing.
Do not recreate the content of the Pull Request documentation. Either summarize it or refer to it.
Capturing the work requested
In the first section of a task the work requested should be documented. This is the responsibility of the task owner to capture. Although a reference to a user story parent task is maintained it shouldn't be assumed that any task accomplished all the work of the user story. Also, the work requested is valuable to capture so it is clear for the product owner and scrum master that the task owner understands what they are working on for the task. This can be documented in one or more clear bullets.
Capturing the work performed and important notes
The second section of a task is a bulleted or numbered list of the work performed and any critical notes for the reader. History has shown that it is valuable to cover the following things:
- A bulleted summary list of each "change" or "pull request" made and what was done in that change. This is not meant to replace the pull request documentation but to give the reader a summary of the work.
It is also valuable to note if these changes were reverted by a later change but are present in the reviews.
- In addition references to any designs produced or used in the task should be linked or referenced here (like if it was attached to the task).
- It can be useful also for engineers reviewing this work or looking at it in the future to have any "non-obvious" notes added on how this work was setup, tested or developed. Examples of this are notes on how to configure the work for testing if it is non-trivial.
Capturing the Unit testing performed
At minimum if the software can be unit tested it needs a statement (or multiple) to indicate what unit tests were run, the results of the run and when it was run. If the software cannot be unit tested it is important to note that it isn't applicable (N/A). When documenting any test there are two formats of test documentation you can follow. The first and most common is for automated unit tests and the other type of documentation is for manually developed tests.
Integration or other automation testing.
After the unit testing section is a section on integration or other types of testing (normally manual). It is separated from the unit testing section to indicate that this type of testing might require documentation on the environment under test or special test conditions. Also, some teams cannot execute this type of testing though CI (Continuous Integration) during gating of commits. Since for some teams this cannot be automatically triggered it is important have this type of testing segregated in that it may not be run again unless triggered manually.
The key difference between the unit testing and integration/other testing section is documentation of the environment or configuration when in an integration or other automation test.
Automated Test Documentation Format
When executing automated tests you should use a statement like one of the following:
* Executed 37 unit tests in project Code.MyTests. PASSED, MAY-3-2021, PJL
* Developed and Executed 40 unit tests. 2 Failed, MAY-21-2021, PJL. Repair documented in Bug 3423423 (Link)
* Obtained 82% unit test coverage with 142 unit tests run. PASSED, JUNE-22-2021, PJL
* Executed 100 integration tests in project Code.MyIntTests. "Lab 23A Environment w/ Probe PR23400-A", PASSED, JUNE-22-2021, PJL
* Obtained 77.4% API test coverage with 30 integration tests run. Environment CL-J, PASSED, JUNE-22-2021, PJL
The key things to cover in this statement are the following:
- How many tests were executed? This can indicate to the reviewer what kind of testing was done.
- Did the test pass or fail? If the test failed what is being done about it (RPI, Bug, another task, etc...). You can using work item links to link directly to that task and a status of the other work item will appear.
- If not a unit test, where was this test run and was any special equipment used in the measurement?
- When did you run this testing? Make sure you use an internationally supported date format like Full month, day, full year to make it clear.
If you ran the tasks multiple times and make fixes, only document the last run that is being used for submitting this work for review.
- Your initials that indicate you were the one who executed the tests and are logging the test run.
Manual Test Documentation Format
When running manual tests you need to document the test protocol/steps. The following is an example of one of these tests.
Scenario: Web pages display correctly, "Environment CL-Chaska7 CLN22 TRR6, OneApp v5.2 TRR 6"
1. Login to Web site at https://www.helloworld.com using credential MyAccount, Default Password for Testing
2. Select Menu Option "Things I want to test".
3. Verify, On the top of the page it indicates "Lots of testing to do".

   PASSED, AUGUST-22-2021, PJL

4. Select Menu Option "Things I don't want to test".
5. Verify, On the bottom of the page it shows "And that is all I don't want to test.".

   FAILED, AUGUST-22-2021, PJL, Issue documented in RPI 232322 (Link)
Just like automated tests, manual test verification steps should show the environment/tools in use (if applicable), if the test passed or failed, the date executed, initials of who ran the test and if it failed links to work items for repair or future analysis.
Using Work Item templates
One or more work item templates can be saved at a Azure DevOps project level. These can be used to initialize the work item following the notes and template the team wants to use. A base template called "Task with Documentation" will be provided for all teams to use by the Simplified DevOps Architecture teams.
To create a template do the following
- Select "New Work Item", "Task"
- Fill out a sample of what all the fields should look like including the description.
- Select the "..." on the upper right corner.
- Select "Templates"
- Select "Capture"
- Fill out the name and documentation.
The template needs to be assigned to a specific project to be saved, organization wide templates are not supported.
Starting a task using a template
- Select "New Work Item", "Task"
- Select the "..." on the upper right corner.
- Select "Templates"
- Select the "Task with Documentation" template (or another template since templates are unique per project).
- Edit the bullets or entries in each section following the guidance given in the process template.
Saving a hyperlink to a create work item with a specific template
Note that a Hyperlink can be obtained that spawns this work item with this template. To get this URL go to the template in
- Project Settings, Team Configuration
- Select tab "Templates"
- Select the work item type, for example, "Task".
- Select the "..." on the template row.
- Select "Copy Link"
- Navigate to this Link and bookmark it.
The following is an example of a possible work item template:
Other references
Online documentation on using templates with work items can be found on the Online Azure DeVops documentation.